Data sources
Lochness supports pulling data from a number of data sources. This page will show you how to configure these data sources both in the source, keyring, and configuration file.
As a reminder, to have AMPSCZ-Lochness download any data from given sources, it requires either REDCap or RPMS linked to Lochness. Lochness loads list of unique IDs from the chosen database, as well as the corresponding mindlamp IDs for each subject.
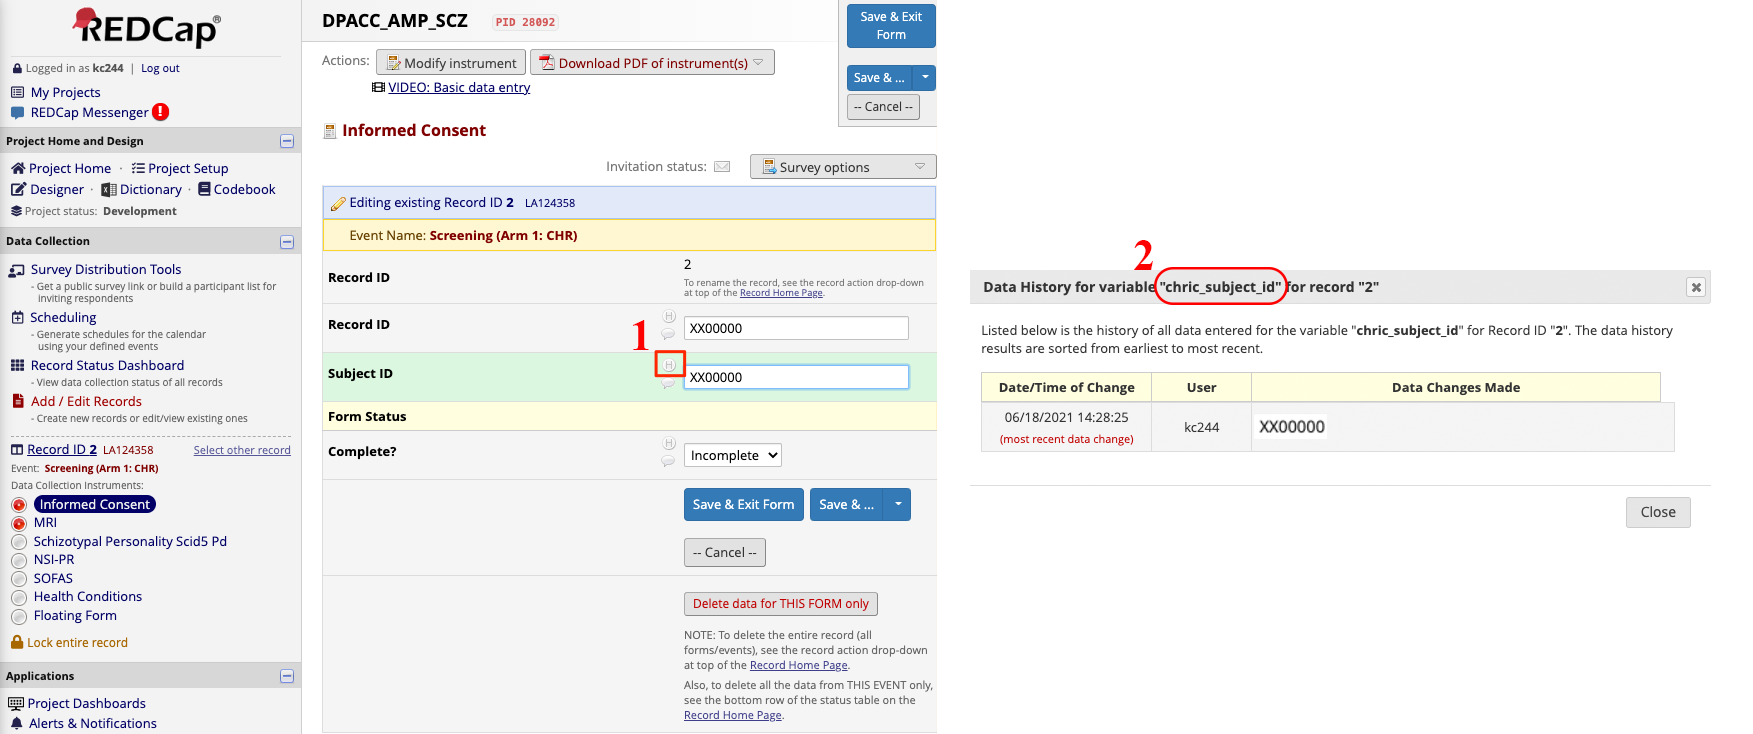
AMP-SCZ subject ID follow the pattern of XX00000, where
The first two capital letters represent unique site.
The five unique digits for each subject.
REDCap
REDCap project settings
On the REDCap project, the following fields are required.
ID
Date of consent
Mediaflux ID
You need to have the exact the name of each field, which you can find out by clinking ‘H’ button next to the field on the dictionary view page.
Also, REDCap data entry trigger should be enabled to send a POST signal to the same server hosting AMP-SCZ Lochness. This server should have a open port available to listen to the POST signal from REDCap. Tick the box under “Project Setup” >> “Additional customizations” >> “Data Entry Trigger” and give it a address:port to the “URL of website”
https://<IP address of the data aggregate server>:9999
REDCap De-identification
For each PHOENIX study, you may add an entry to the Lochness configuration file indicating that data from REDCap should be de-identified before being saved to the filesystem. Please refer to the redcap configuration file documentation for more details.
REDCap keyring settings
First you need to create a section at the root of your keyring for your
REDCap connection details. You can name this section whatever you like as
long as it is valid JSON. Within this section you’ll need to add a URL
field and a subsection named API_TOKEN where you will store all of your
REDCap Project API tokens. There are two parts required for the REDCap.
Part 1 at the top will link each site to redcap.Pronet credentials
{"lochness" :
    {"REDCAP":
        {"PronetXX": {"redcap.Pronet": [ "Pronet" ]},
         "PronetAA": {"redcap.Pronet": [ "Pronet" ]}}
     }
 }
Part 2 will have the actual credentials of the redcap.Pronet REDCap
project
{"redcap.Pronet":
    {"URL": "https://redcapynh-p11.ynhh.org",
     "API_TOKEN": {"Pronet": "EAXBWERAAWETYZXCGOAWERY"}}
}
Note
To generate a REDCap Project API Token, use the API section under your
REDCap Project Settings page.
REDCap settings in the configuration file
pii_table: {args.pii_csv}
lochness_sync_history_csv: {args.lochness_sync_history_csv}
redcap_id_colname: chric_record_id
redcap_consent_colname: chric_consent_date

redcap:
    PronetXX:
        deidentify: True
        data_entry_trigger_csv: {args.det_csv}
        update_metadata: True
    PronetAA:
        deidentify: True
        data_entry_trigger_csv: {args.det_csv}
        update_metadata: True
Location of table to be used in deidentifying redcap fields Lochness sync history database csv path Redcap data entry trigger database csv path
RPMS
To have Lochness download data automatically from RPMS, you need a few things.
Get RPMS_PATH
Since RPMS exports data into a directory daily, you will need to provide this RPMS data export path.
Create keyring section
Next, you need to create a new keyring section for your RPMS instance.
This section must be named rpms.xxxxx where xxxxx can be any
string that is both valid JSON and match rpms column values in the
metadata.csv.
Within your new section, you must add your RPMS RPMS_PATH
{
  "rpms.xxxxx": {
    "RPMS_PATH": "..."
    }
}
XNAT
For each XNAT instance you wish to pull data from, add a new connection
details section to the root of your keyring. The name of this section
can be whatever you like as long as it’s valid JSON. Within your new section,
add the URL, USERNAME, and PASSWORD fields
{
  "xnat.example": {
    "URL": "https://xnat.example.org",
    "USERNAME": "...",
    "PASSWORD": "..."
  }
}
metadata file entry
A valid metadata file entry should look as follows
Active,...,XNAT,...
1,...,xnat.example:PROJECT:SUBJECT,...
Where xnat.example would be a valid keyring section, PROJECT would
be a valid XNAT project, and SUBJECT would be a valid XNAT Subject.
Attention
The SUBJECT component of this metadata entry should be a valid XNAT
Subject, not just a MR Session. All MR Sessions for that XNAT Subject
will be downloaded.
Box
To have Lochness download data automatically from Box, you need a few things.
create access token
First, you need to get CLIENT_ID, CLIENT_SECRET and API Access Token from the app created on the https://app.box.com/developers/console. The token should be a 32-character alphanumeric string.
create keyring section
Next, you need to create a new keyring section for your Box instance.
This section must be named box.xxxxx where xxxxx can be any
string that is both valid JSON and match box column values in the
metadata.csv.
Behind the scenes, Lochness will use this string to import a module from
lochness.box. Within your new section, you must add your Box CLIENT_ID,
CLIENT_SECRET and API_TOKEN
{
  "box.xxxxx": {
    "CLIENT_ID": "...",
    "CLIENT_SECRET": "...",
    "API_TOKEN": "..."
    }
}
metadata file entry
A valid metadata file entry should look as follows
Active,...,Box,...
1,...,box.xxxxx:SUBJECT,...
Where box.xxxxx would be a valid keyring section and SUBJECT
would be a valid Subject folder name in Box. This folder name does not
necessarily have to match the PHOENIX subject.
delete on success
You can configure Lochness to delete files from Box on successful download. For details, please refer to the box delete_on_success configuration file documentation
box base
You can configure Lochness to begin searching your Box account starting from a specific subdirectory. For details, please refer to the box base configuration file documentation.
Mediaflux
A standalone documentation for the interaction between Mediaflux and lochness is available here. Specifically, you can take a look at mediaflux#keyring-file and mediaflux#metadata-file. Learn about login credentials necessary for the keyring file from https://wiki-rcs.unimelb.edu.au/display/RCS/Configuration+File. You may authenticate with Mediaflux using your credentials or a secure token as mentioned in the above Wiki.
Mindlamp
To have Lochness download data automatically from Mindlamp, you need a few things.
Get URL, access key and secret key
First, you need to get URL, ACCESS_KEY and SECRET_KEY from the mindlamp.
Create keyring section
Next, you need to create a new keyring section for your Mindlamp instance.
This section must be named mindlamp.xxxxx where xxxxx can be any
string that is both valid JSON and match mindlamp column values in the
metadata.csv.
Within your new section, you must add your Mindlamp URL, ACCESS_KEY and
SECRET_KEY
{
  "mindlamp.xxxxx": {
    "URL": "...",
    "ACCESS_KEY": "...",
    "SECRET_KEY": "..."
    }
}
metadata file entry
A valid metadata file entry should look as follows
Active,...,Mindlamp,...
1,...,mindlamp.xxxxx:SUBJECT,...
Where mindlamp.xxxxx would be a valid keyring section and SUBJECT
would be a valid Subject folder name in Mindlamp. This folder name does not
necessarily have to match the PHOENIX subject.